The pottery painting ideas that finish inside one studio session share three traits: a small piece, one repeating motif and no more than two colors. Dipped color blocks, sponged speckles, taped stripes and rim patterns all fit a two-hour booking; detailed scenes do not.
Plan for three thin coats of underglaze, because one coat fires patchy.
Most people walk into a paint-your-own-pottery studio, pick the biggest platter on the shelf and spend forty minutes staring at it. The clock is the real limit, not drawing ability. A session runs ninety minutes to two hours, and that time has to cover choosing a piece, painting it and cleaning up.
So this list is built backwards from that clock. Every idea below is sized to a mug, a small bowl, a trinket dish or a single plate, and most use a technique that repeats rather than a picture you must get right once. Several use tape, a sponge or a needle tool to do the precise work for you.
Jump to a Section
Pottery Painting Ideas at a Glance
Pick an idea that fits your time slot and your confidence with a brush.
| Idea | Best Piece | Main Tool | Time | Skill |
|---|---|---|---|---|
| Two-tone dip | Mug | Tape and flat brush | 25 min | Beginner |
| Sponged speckles | Mug | Torn sea sponge | 20 min | Beginner |
| Taped stripes | Tumbler | Painter's tape | 60 min | Beginner |
| Raised dots | Small bowl | Round brush | 40 min | Beginner |
| Rim line | Plate | Liner brush, turntable | 15 min | Beginner |
| Cornflowers | Bud vase | Liner brush | 50 min | Intermediate |
| Checkerboard | Square dish | Flat brush | 45 min | Beginner |
| Heart ring | Trinket dish | Round brush | 50 min | Beginner |
| Rainbow arches | Planter | Pencil, round brush | 40 min | Beginner |
| Mountain range | Mug | Flat brush | 45 min | Beginner |
| Feather marbling | Shallow dish | Needle tool | 15 min | Beginner |
| One-word lettering | Mug | Round brush | 20 min | Intermediate |
| Abstract strokes | Bottle vase | Flat and liner brush | 20 min | Beginner |
| Outlined mushrooms | Bowl | Black liner | 75 min | Intermediate |
| Sun and moon | Plate | Liner brush | 70 min | Intermediate |
| Leopard spots | Straight cup | Round brush | 45 min | Beginner |
| Wavy lines | Mug and saucer | Liner brush | 50 min | Beginner |
| Citrus slices | Serving plate | Round brush | 90 min | Intermediate |
| Cat silhouette | Mug | Round brush | 40 min | Beginner |
| Night sky interior | Small bowl | Round brush | 60 min | Beginner |
| Ombre fade | Tall vase | Wide brush, damp brush | 45 min | Beginner |
| Scalloped rim | Dinner plate | Round brush | 40 min | Beginner |
1. Dip the Bottom Third in One Flat Color

Wrap tape around the mug at the height you want, about a third of the way up. Press the edge down hard with a fingernail, paint below it, then peel the tape while the underglaze is still damp.
Three thin coats give a flat, even color. One coat dries streaky, and two still show brush drag once the clear glaze goes on top.
2. Sponge On Speckles With a Torn Sea Sponge

Load the sponge lightly, blot it once on a paper towel, then press without dragging. Vary the pressure rather than the color: press harder for solid dots and barely touch the surface for fine speckles, all with one loaded sponge.
3. Tape Off Vertical Stripes in Two Colors

Tape from the rim down and let the stripes narrow naturally toward the bottom instead of trying to keep them parallel. One-inch tape gives you a wide stripe when you paint beside it, and a wide gap when you paint over it and peel.
Paint the wide mustard stripes first, let them dry, then add thin navy lines between them with a liner brush.
4. Build Raised Dots With a Loaded Brush

Work in horizontal rows, about a thumb width apart, and offset every second row. Let each row set for a minute before starting the next, or your hand will smudge the dots you just placed.
5. Paint One Thin Line Around the Rim

Rest your painting hand on the table and hold a loaded liner brush still. Rotate the plate with your other hand on a banding wheel or a lazy Susan. Keep the line about a centimeter in from the edge so the rim itself stays clean.
A slight waver is the only sign a hand made it, and that is part of the appeal.
6. Scatter Cornflowers Across a Bud Vase

Paint each bloom as a cluster of short strokes worked outward from a dark center. That is much easier than drawing an outline and filling it in.
The stems sell it. Load a fine liner thinly, drag it upward in one motion, and let the line taper where the brush runs out of color.
7. Brush a Loose Checkerboard on a Square Dish

Aim for about five squares across a small dish. Finer than that and the brush strokes stop reading as hand painted. Load the brush for two squares at a time so the black stays consistent; reloading for every square makes some darker than others after firing.
Black can look grey before firing. Our guide to glazes and firing explains how underglaze colors change in the kiln.
8. Ring a Trinket Dish With Hearts in Three Pinks

Paint each heart as two fat commas meeting at a point rather than an outline you fill. It is faster and the shape comes out rounder. About fourteen hearts fit around a dish this size.
9. Stack Rainbow Arches on a Planter

Some studio blanks come with a raised arch already molded on; on a plain planter, paint flat arches instead. Draw the outer arch first, then work inward. Terracotta, blush and cream sit close on the color wheel, so no single band jumps forward.
Keep the arches half an inch below the rim. Running them to the top edge makes the planter look cropped once a plant fills it.
10. Wrap a Two-Tone Mountain Range Around a Mug

Paint the back range in taupe and let the front range in blue overlap it. That single overlap is what creates depth. Dip or paint the handle in the same blue to tie the design together.
11. Marble Two Colors With a Needle Tool

Flood the surface with white underglaze. While it is still wet, drop rings of blue on top. Then drag a needle tool through in one continuous spiral from the outside in.
Work fast, because the effect only happens while both colors are wet. If the white starts to look dull, mist it lightly and keep going.
12. Letter One Short Word in Brush Script

A longer phrase forces you to reload mid-word, and the reload always shows. Most people paint the word too small on the first try, so draw it large on paper and match that size.
13. Combine Broad Strokes With Scratchy Lines

Pair a loaded flat brush for a few wide strokes with a nearly dry liner for thin, scratchy lines. For the scratchy marks, wipe most of the color out of the brush, drag it fast and let it skip across the clay.
14. Outline Mushrooms in Black, Then Fill

Draw each mushroom in black liner and let it dry. Fill the caps red and the stems cream. The black line hides any fill that goes slightly over the edge. Five or six mushrooms at slightly different heights fit around a bowl.
Add the white dots last, once the red is touch dry, or they turn pink.
15. Pair a Sun and a Moon on One Plate

The sun's rays do most of the work: straight lines of alternating length worked outward from the circle. Paint the faces last with the thinnest brush you have, since a face drawn first will get bumped while you paint around it.
Keep both motifs inside the flat center of the plate. Designs on the sloped rim look distorted when the plate is seen straight on.
16. Paint Leopard Spots as Broken Rings

Paint the tan blobs first in a loose scatter and let them dry. Then add two or three dark brown arcs around each one, leaving gaps.
A straight-sided cup is worth painting even if you have plenty of mugs. It holds brushes, pens and toothbrushes better than a tapered one, because it does not tip.
17. Wrap Wavy Lines Around a Mug and Saucer

Keep the wavelength the same on both pieces and let the rows sit a little closer near the base, which follows the curve of the body. Paint the handle too; that is what makes the set look considered rather than half finished.
Freehanding the top row almost always drifts upward as you come around the far side, so pencil the first wave in.
18. Fill a Serving Plate With Citrus Slices

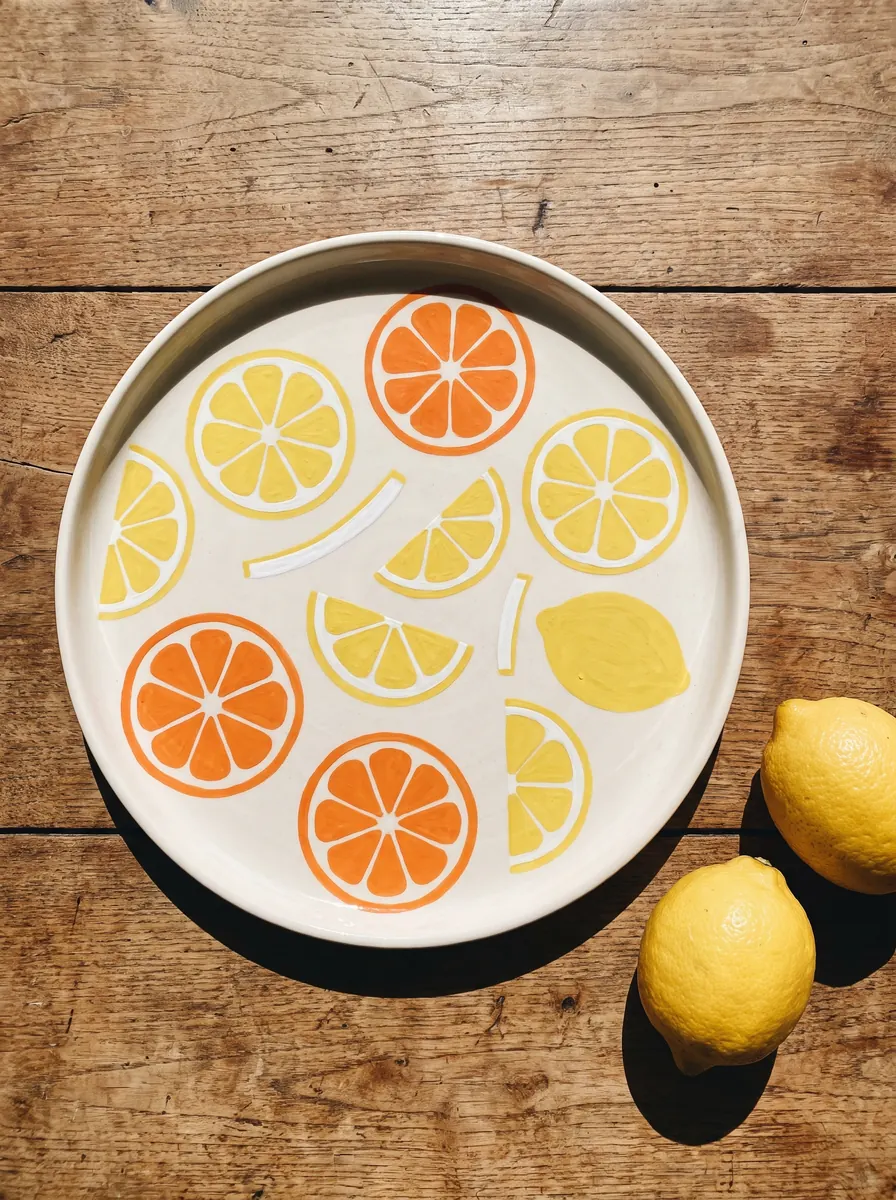
Draw each slice as a circle, add a small center dot, then run eight lines out to the edge as segment guides. Fill the segments and the peel ring, and leave the gaps between segments as bare clay. Add one or two whole lemons and a few peel curls for variety.
Turn the plate as you work so every slice sits at a different angle. Slices all facing one way look like wallpaper.
19. Paint a Cat Silhouette and Dip the Handle

Fill the shape solid and keep the outline simple. Paint the handle in the same black to tie the design to the mug. You can also scratch the whiskers through the black with a needle tool once it is dry, a technique called sgraffito.
Black underglaze often covers in two coats, so check your jar before automatically doing three.
20. Paint a Night Sky Inside the Bowl Only

Paint three coats of navy inside the bowl and let them dry. Add cream six-pointed stars and small dots on top. Underglaze layers cleanly once the coat beneath is dry, while dark over light would need extra coats to look solid.
Vary the star sizes and let a few run up the wall. Even stars in a neat ring look stenciled.
21. Fade One Color From Deep to Bare

Paint three coats at the bottom, two in the middle and one at the top, feathering each boundary with a damp brush before it dries. Stop short of the rim and leave the top third bare.
Work with the vase upside down on a banding wheel so gravity pulls the color toward the base rather than into the pale section.
A tall vase like this pairs well with soft textiles. Our crochet room decor ideas show fourteen handmade pieces to style around it.
22. Scallop the Rim of a Dinner Plate

Twelve to fourteen scallops fit a standard ten-inch plate. Start at twelve o'clock and work around in one direction. The last scallop rarely matches the first exactly, so turn that join to face away from the diner.
For a crisper look, outline each scallop in a slightly darker pink once the fill is dry.
Which Technique Suits Your Session?
Four approaches cover almost every idea above, and they differ mostly in how much of the precision they do for you.
Tape work: Best if you do not trust your hand. The edge is perfect, but burnishing tape on a curved piece takes about fifteen minutes before you paint anything.
Sponging and marbling: Best when you want a whole surface covered fast. Both take under ten minutes, but you cannot place a specific mark exactly where you want it.
Repeating motifs: Dots, hearts, scallops and checks look clearly hand painted, and small errors average out across the repeat. A full ring of hearts takes close to an hour.
Freehand drawing: Lettering, mushrooms and silhouettes are best if you already sketch. There is no undo once underglaze is down, so practice on paper first.
What Happens After You Hand Your Piece Back
Most studios fire the blank once before you paint it. This first firing, called bisque, makes the piece hard and porous, so your underglaze soaks in.
The studio then dips the piece in clear glaze and fires it again, usually to cone 06, about 1,830°F. That second firing is why colors look chalky while you paint and come out bright a week later. Expect seven to fourteen days before pickup.
Most paint-your-own studios use a food-safe, dishwasher-safe clear glaze, but ask yours to confirm. Bare clay areas, such as the top of the faded vase, stay porous and can stain, so keep those pieces for dry use.
Frequently Asked Questions
What are easy pottery painting ideas for beginners? A two-tone dipped mug, a single rim line on a plate, sponged speckles and taped stripes are the easiest pottery painting ideas. Each uses one or two colors and a tool that does the precise work, and each finishes in under an hour.
How many coats of underglaze do I need? Use three thin coats for solid, even color. One coat fires streaky and two can still show brush marks. Dark colors such as black sometimes cover in two coats.
Why do the paints look different before firing? Underglazes look chalky and pale before firing. The heat of the kiln and the clear glaze on top bring out the final bright, glossy color.
Is painted pottery food safe? Painted pottery from a studio is usually food safe on surfaces covered by the studio's clear glaze, since most studios use food-safe glazes. Ask your studio to confirm, and keep bare clay areas away from food and drink.
Choose the piece first and let it suggest the pattern: a small bowl takes a ring of dots, a dinner plate takes scallops, and a tall vase takes a fade. If it is your first visit, try the dipped mug or the rim line, and save the mushrooms and lettering for later.
These pottery painting ideas all fit one booking, so you leave with something you are proud to use.
Save These Ideas for Later
Pin this list to your pottery board so you can come back to it when you are ready to pick your next project.
Save on PinterestKeep reading